Guide to Naviextras Toolbox 4
You can update the map in your navigation system with the help of the Toolbox. It is a free-of-charge application that allows you to purchase, download, and install map updates on your navigation.
To do this, you will need:
- a USB flash drive (recommended size at least 8GB)
- broadband internet connection
-
one of the supported operating systems, installed on your computer:
- The latest Windows version and the two preceding versions are supported (TB4 and TB3), or
- The latest macOS version and the two preceding versions are supported (TB4 only).
1 - Collecting device information from the MG NAVIGATION System
This process is necessary to prepare your USB storage media for map updates.
- Connect a blank USB memory stick to your MG NAVIGATION System. Make sure that no other USB devices are connected. In case the USB memory stick is not recognized, please reformat it to FAT32.
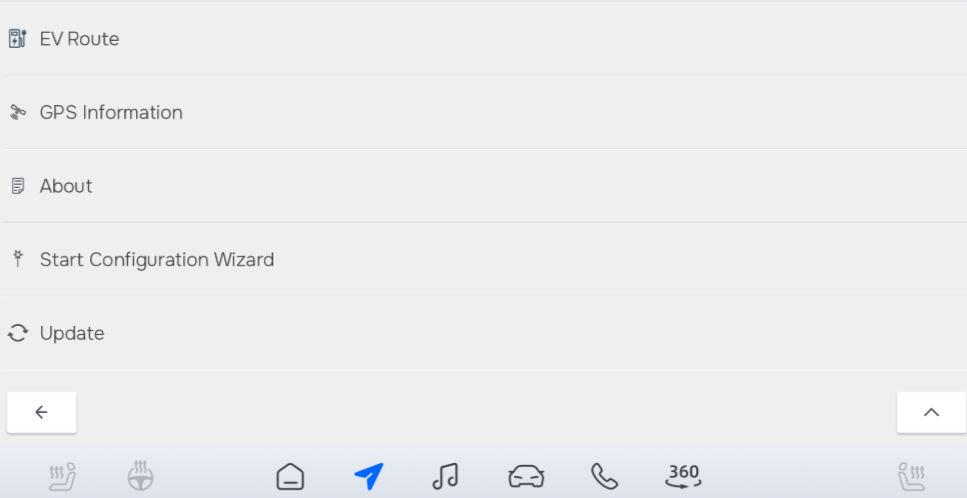
- Go to "Settings/Update", then tap "Start" next to ‘Update Navigation’.

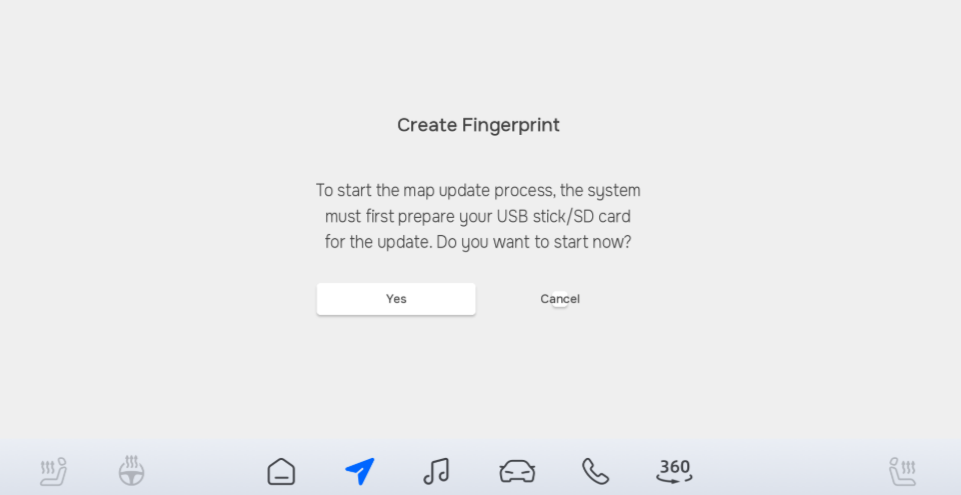
- The system asks you to confirm that you are ready to prepare the storage media for an update. Tap "Yes".

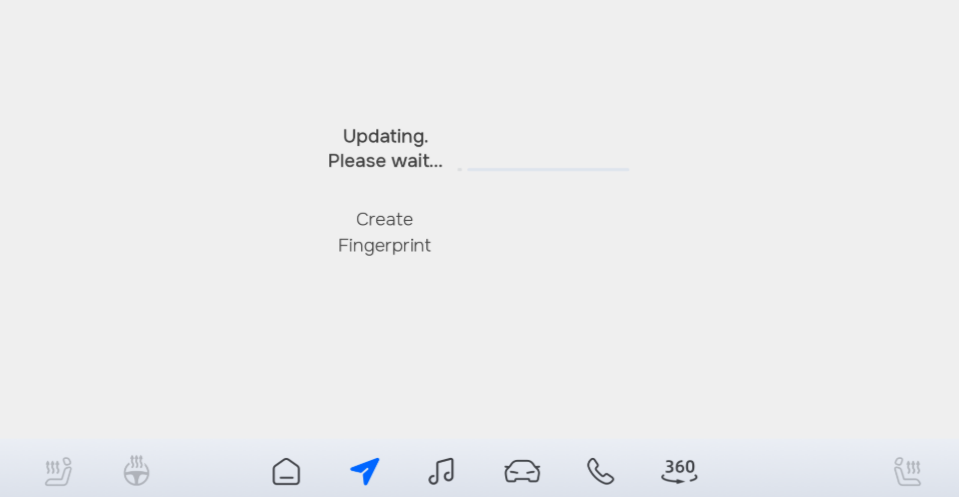
- A status screen is displayed showing the progress.

- Wait until MG NAVIGATION prompts you to remove the storage media. Now you can disconnect the USB memory stick from your navigation system.
WARNING: DO NOT REMOVE THE STORAGE MEDIA AND DO NOT SWITCH OFF YOUR NAVIGATION SYSTEM DURING THE PROCESS!
2 - Installing Naviextras Toolbox
To update the maps on your navigation system, download Toolbox to your PC/laptop.
- Visit model selector choose your device model and download the Toolbox. After installation, start the Toolbox
- Insert the USB flash drive which contains the saved data of your navigation device
- The Toolbox will automatically recognize the navigation data
- Start the Naviextras Toolbox and create your personal account. Do not forget to tick the checkbox for notifications about the latest available maps!
3 - Downloading a first-time map update (Latest Map Guarantee)
When you start using the navigation system, you have 90 days to download the latest available map package free of charge. Follow these steps to download your new maps
- Plug in the USB memory stick that you prepared for the update.
- Start Naviextras Toolbox. After the welcome screen, it takes about 20-30 seconds to detect the authorized device.
- Once it is recognized, the contents of your USB devices are synchronized with the Naviextras map update server.
- After the synchronization is finished, you are requested to log in or create a user account. Click "Login" to continue.
- Log in using your previously created email address and password.
- After logging in, click "Available Updates" (TB4) or "Updates" (TB3), a list of available free map updates is displayed (if you are still eligible), then click "INSTALL".
- The download process starts. At first, the map package will be downloaded to your PC.
- After the download is finished, the system starts installing the map package on your USB device. Please wait for the process to finish.
- Now you can return to your car and transfer the map updates to your navigation system (see 6 Transferring updates to the navigation system).

NOTE: The download process may take longer depending on your internet connection speed.
4 - Downloading a map package with a digital activation code
You may possess a digital activation code for map updates (for example as a result of a promotion or special offer). If so, follow these steps to download your new maps.
- Plug in the USB memory stick that you prepared for the update, then start Naviextras Toolbox and log in (see the previous chapter for detailed instructions).
- On the ‘Home’ screen, click "Redeem a code" (TB4) or "I HAVE A CODE" (TB3).
- Enter the digital activation code, then click "USE CODE" (TB4) or "REDEEM THE CODE" (TB3).
- The system will check the code and summarize the contents of the available map package. At this point, the activation code is still considered as unused. If you decide the use the code now, click "SELECT" (TB4) or "CHOOSE" (TB3) to proceed. Once you click "SELECT/CHOOSE", the code will be considered redeemed, and it can no longer be used on other navigation systems.
- Toolbox confirms that the code has been redeemed and cannot be activated again. Click "AVAILABLE UPDATES" (TB4) or "Install" (TB3) to get the map package now.
- The download process starts. At first, the map package will be downloaded to your PC.
- After the download is finished, the system starts installing the map package on your USB device. Please wait for the process to finish.
- Now you can return to your car and transfer the map updates to your navigation system (see 6 Transferring updates to the navigation system).
5 - Purchasing additional map updates
Roads are changing all the time. New roads are built, traffic rules are changed and new restrictions are set continuously, and there are plenty of other changes that may affect your planned route. Hence we recommend that you update your maps as frequently as possible, but at least once a year. You can also use Naviextras Toolbox to purchase or rent map packages of additional countries or regions.
To purchase map updates, follow these steps.
- Plug in the USB memory stick that you prepared for the update, then start Naviextras Toolbox and log in.
- In Toolbox, go to the ‘Home’ screen and click "Buy maps" (TB4) or "Shop" (TB3).
- Browse the list of available items. You may see map updates for your existing maps, maps for other regions, or additional navigation content for your maps (such as places of interest or a safety camera database).
- Read the description of the selected content, then click "ADD TO CART", read the pricing information then click "CHECKOUT" (TB4) or "GO TO CHECKOUT" (TB3).
- Go through the payment process, select the checkboxes, then finish the purchase by clicking "PAYMENT" (TB4) or "SENDING THE ORDER AND PAYMENT" (TB3). You will be redirected to the payment screen.
- Choose the type of your credit/debit card and enter card information.
- After successful payment, the purchased content appears in the list of "Available updates" (TB4) or "Updates" (TB3). Continue with the download and installation steps as described in the previous sections of this guide.
- After installation, eject the USB flash drive, insert it into your vehicle’s head unit and upload the map update to your navigation system (see section 6.).
6 - Transferring updates to the navigation system
Once you have finished downloading the updates on your PC, then as a final step, you need to transfer them to your MG NAVIGATION System.
During the transfer process, do NOT switch off the vehicle’s ignition, otherwise you may need to start the transfer again.
- Plug in your USB memory stick that contains the updates to its slot on the navigation system. Make sure that no other USB devices are connected.
- Go to "Settings/System", then tap "Start" next to ‘Update Navigation’.
- The system asks you to confirm that you want to update the map content of the navigation system. Tap "Yes".
WARNING: DO NOT REMOVE THE STORAGE MEDIA AND DO NOT SWITCH OFF YOUR NAVIGATION SYSTEM DURING THE PROCESS. - Wait until the system displays a notification that the update is successfully completed. Tap "OK" to continue
- Remove the USB memory stick. The navigation system will now start using the new maps. Tip: To make sure that your new maps are correctly installed, you can check the map data version on your system as described in the next chapter of this guide.
7 - Checking the map data version on the navigation system
- In the main menu of your navigation system, tap About.
- In the ‘About’ menu, tap Content.
- Scroll down in the ‘Content’ menu and tap Maps.
- In the ‘Maps’ menu, the year and quarter (or month) of map data publication is indicated after the name of each country or region for which you have map coverage on your system. Check these dates if they match the publication dates of your newly installed maps.
- (optional) If the new map content seems unavailable, repeat the installation process. Please contact our customer service if you have questions or problems with the update process.